Step 1 - Insert the Table
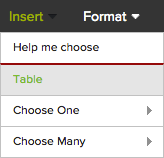
There are several ways to add a new table:
a. Within Survey Builder go
to Insert | Table.
b. Select the question type from the Help me choose menu.

c. Choose the table icon from the Quick Start toolbar.
![]()
For more information, view the self-paced tutorial called "Bonfire: Creating Tables".
Step 2 - Define the Table: General Tab
The Edit Table screen appears:
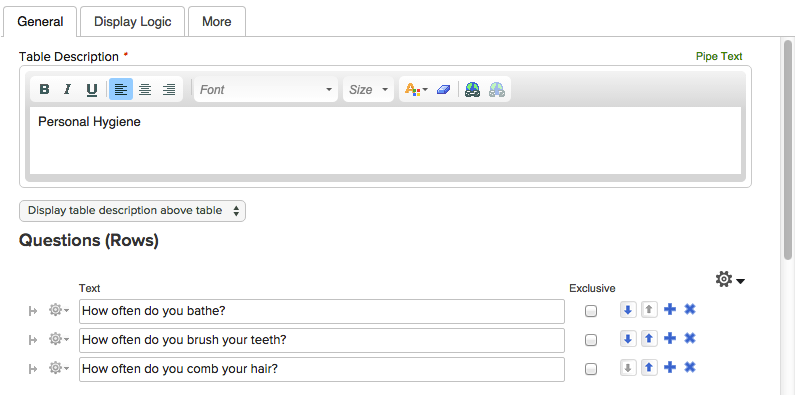
It is composed of the following sections:
In the Table Description area of the page you give the table a title.
Table Description - provide a description for the table. It might be something short, like a title. Or, it might be instructions for filling in the table. This is a required field.
Table Description Display Options - choose from among the following:
Display table description above table - text appears above the table
Display table description inside table - text appears in the upper left cell of the table
Hide table description - hide the text altogether
See this topic for further information.
In a table, the rows are the questions you're asking. In general, a table lets you group together multiple questions that have the same set of answers. For example, you might ask for satisfaction rate across multiple attributes of a recent customer conference.
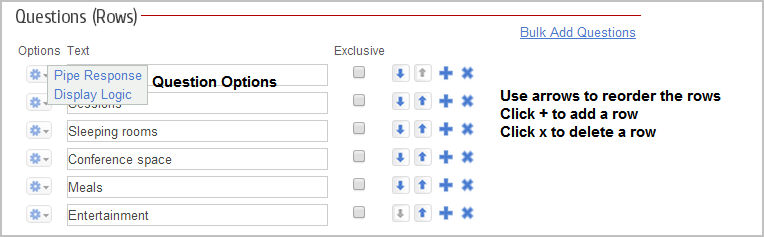
In the Questions (Rows) section of the page, you will have some or all of the following options:
Pipe Response - click this link to pipe text from a previous question into the current question.
Display Logic - set row level display logic.
Question (Rows) Text - the table rows are the questions you are asking. A table is made up of multiple questions that all have the same set of possible answers.
Exclusive - make the question exclusive.
Answers (Columns) Type - lets you choose the type of answers, such as Choose One, Choose Many, etc.
Answer Text - the text of the answer set.
Weight - allows you to enter a value for scale questions to indicate relative value. For example, if you use NPS® as a loyalty measure, you would weight your answers from 0 to 10. If you use 0 (zero) as a valid weight, there are some setup requirements. Click here to see the topic on zero weighting.
Add Another Answer Group - allows you to add another answer group. For example, you might have one answer group that asks respondents how satisfied they are, and another group that allows them to comment on their satisfaction answer.
Bulk Add Questions/Answers - lets you create a list of questions/answers that can populated the question or answer fields. This is particularly useful if you already have a list in another document. You can copy and paste the list into the Bulk Add Answers dialog. When you click OK, they will each be entered as a separate answer choice.
Step 2 - Define the Table: Display Logic Tab
On the Display Logic tab you set up the logic that controls whether or not and under what circumstances the question will appear. Learn about it here.
Note: The default display logic is for the question to always appear, so that is what will happen if you do nothing on this screen.
Step 3 - Define the Table: More Tab
The More tab presents you with additional options for setting up your table.
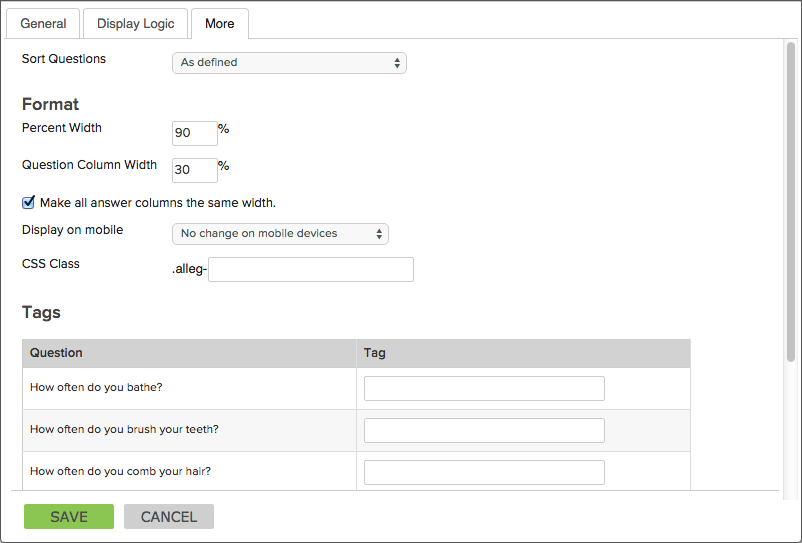
The settings on the More tab will vary depending on the question type you choose. These are the possibilities:
This question is required - used to require that respondents answer the questions before proceeding to the next page.
Question Tag - used to provide a short name for the question. Tags have multiple purposes, including piping, data mapping (pre-population and historical data imports), and validation expressions.
Sort Answers - used to sort the answer set in random order, inverted order or alphabetical order
Columns - allows you to specify that the answers be spread over more than on column to prevent vertical scrolling
Maximum number of answers - for Choose Many questions, you can set the maximum number of responses allowed
Minimum number of answers - for Choose One questions, you can set the minimum number of responses that must be entered
Default - for Short Textbox and Long Textbox questions, you can enter default text that automatically appears in the field, but can then be edited by the respondent
Maximum Length - for Short Textbox and Long Textbox questions, you can restrict the number of characters that can be entered. Short textbox will accept from 1-255 characters; Long textbox will accept from 1-32000 characters.
Format - lets you control various aspects of the table's appearance.
Percent Width - when using Single Column layout, this value specifies the width of the question as a percent of the survey page width
Question Column Width - in a table question, this value specifies the width of the first column which contains question text.
Make all answer columns the same width - auto-sizes the columns to the same width. By default, columns are sized to fit the width of the answer text for each column
Display on mobile - choose from these options:
No change on mobile devices - display will be the same across devices.
Display answers in a drop down list - switches the table display to show a dropdown question for each question in the table, making it easier to view on mobile devices
Display question in its own row - TBD
Help Text - allows you to provide additional information that the respondent can view if necessary. Use the formatting tools to define how the help text should display.
Click Save when you have finished defining your table.