The Manage Recipients report allows you access to information about everyone who has been invited to take your survey. You can use it to edit recipients, activate and delete a recipient, and resend invitations.
First, go to Surveys & Data Collection | Survey Hub | <desired_survey> | Manage. On the Manage Survey page, click Manage Recipients:

The Manage Recipients page appears:

Note: If you want to view the recipients for a specific email list, it may be simpler to select it and open the manage recipients report from the Manage Email Lists page. Filtering for an email list from the Manage Recipients screen will require that you enter the exact name of the email list in the filter.
The Manage Recipients page allows you to do the following things:
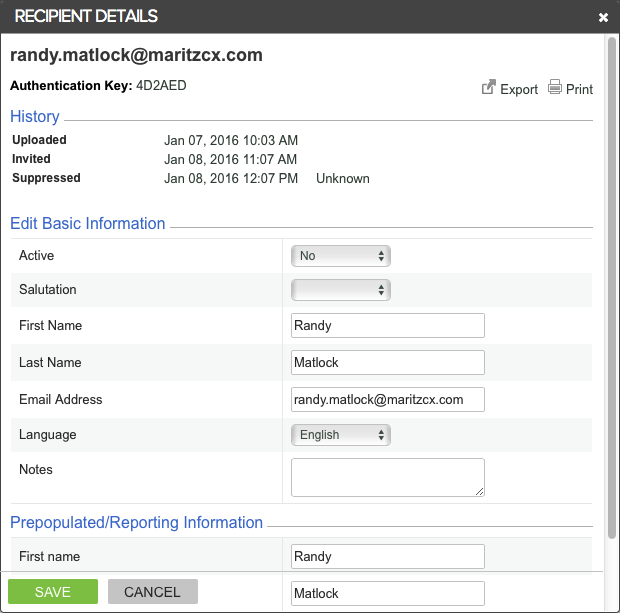
Edit - To edit a recipient, click its checkbox and then Edit.
Resend Invitations - You can resend invitations at any time. For example, an invitee may accidentally delete their invitations, or you may need to fix an invalid email invitation. To do so, check the appropriate recipients and then click Resend Invitations.
Activate - To
activate a deactivated recipient, click on its gear icon [ ] and select Activate.
Or, to deactivate more than one recipient, check the appropriate recipients
and then choose Deactivate from
the More menu.
Deactivate - To
deactivate an active recipient, click on its gear icon [ ] and select Deactivate.
Or, to deactivate more than one recipient, check the appropriate recipients
and then choose Deactivate from
the More menu.
Delete - To delete
a recipient, click on its gear icon [ ] and select
Delete. Or, to deactivate more
than one recipient, check the appropriate recipients and then choose Delete from the More
menu.
Configure Columns - You can control the columns that display on the Manage Recipients list. To do so, select Options | Configure Columns.
Configure Access - Use this to set specific levels of access for analysts.
Configure CSV Export - Use this to export your recipients list in CSV format.
Schedule Export - TBD
Manage Schedules - TBD
Note: When you add recipients onto an email list, they are automatically activated. If you deactivate them, they will remain on the list, but no longer receive invitations and reminders. This is the recommended way to deal with recipients you no longer want to send to, since deleting them will also delete their submitted response.
Sometimes you need to edit a recipient after invitations have been sent. It could be as simple as changing the invitation fields, such as name or email address. Or, it could involve changing the values that are used for pre-populating hidden questions. To do so, select the recipient you want to modify and click Edit.


Some columns display by default and others can be turned on/off.
View—displays recipient details; you can edit and resend invitations from here.
Actions—links to activate, deactivate, and delete an individual recipient
Email address
Active—current status of the recipient
Invitation Status—status of the invitation, such as Uploaded, Invited, or Sampled Out
Response Status—status of the response, such as No Response, or Complete
Invited On—the date when invitations were sent
Reminders—the number of reminders that have been sent
First Name
Last Name
Bounce Reason—the reason an email bounced
Authentication Key—the key assigned to the user so their URL link to the survey is unique.
Reminded On—the date when the most recent reminder was sent
Bounced On—the date the email bounced
List of pre-populated fields—each field that was mapped fore pre-population will appear on the list and can be added to the display
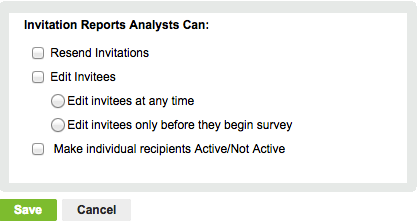
You can allow analysts to access invitation reports, including the Manage Recipient report. However, you may not want analysts to be able to edit recipients or resend invitations. You can choose specific levels of access for analysts; however, the options you set apply to all analysts for a specific survey. You cannot assign access differently for individual analysts.

Follow these steps to configure analyst access:
1. Select Configure Access from the Options menu on the Manage Recipients page.
2. Check the appropriate level of access for all of your analysts.

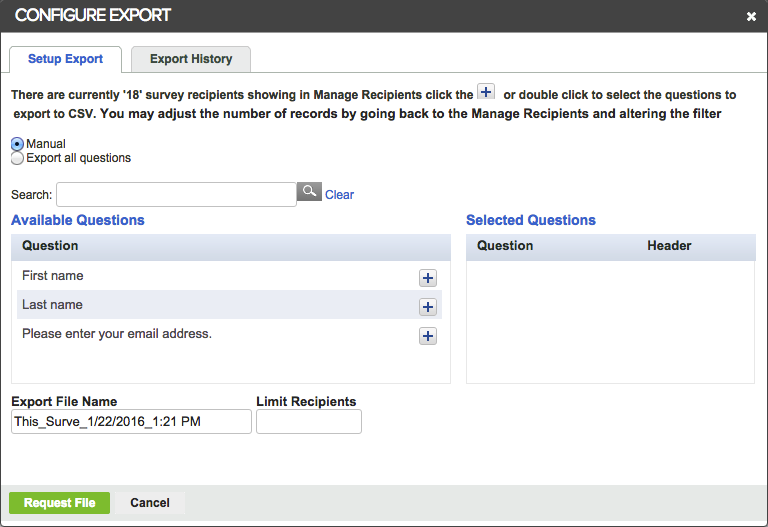
When viewing a list of recipients, you may want to export the list to a csv file for viewing outside the MaritzCX platform. By default, all the columns that are currently displayed will be exported. You can either configure the columns to change the display, or simply choose additional questions as you configure the export. You have several configuration options.
Take the following steps to configure your CSV export:
1. Click Export | Configure CSV Export from the Manage Recipients list.
2. Select one of the following:
a. Manual—choose individual questions from the Available Questions list for export.
b. Export all questions—automatically export all available data
3. Accept or make changes to the file name—the default name is a combination of the survey name and a date/time stamp.
4. Enter a value in the Limit Recipients field if you want to export less than the entire list.
5. Click Request File. You will be immediately switched to the Export History tab.
6. Click the Download link.