Survey options control various aspects of the survey as a whole. Some of the options you can set here are also available when you leave Survey Builder and go to Survey Management.
Go to Options | Survey Options.

The Edit Survey Options page appears. It contains three tabs:

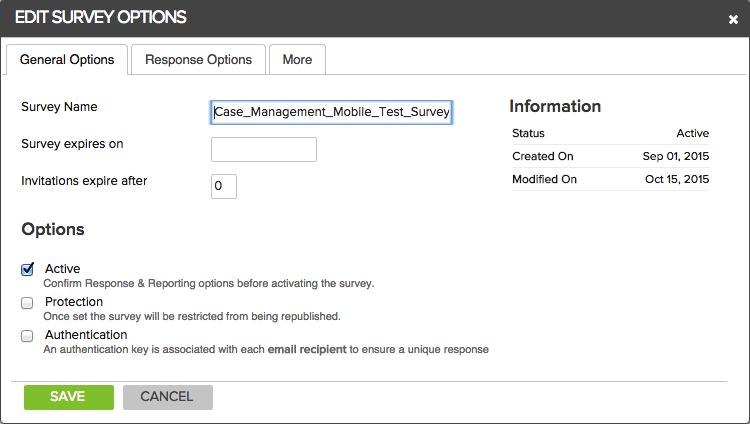
On the General Options tab you control the following aspects of the survey:
Survey Name - This is a description of your survey. It is displayed on the Survey Hub and in reports. This description is not displayed to survey respondents. To change the title of the survey that the respondents see, you must change the Survey Title in the Survey Builder and republish the survey. Be aware that if the survey title in the Builder, the file name you assign when you save the survey and the survey name you set here are different.
Survey expires on - If a survey expiration date is specified, then your survey will be deactivated when that date is reached. For this option, a day is from 12:00am - 12:00pm. So, if you set the date to December 12th, the survey expires at 11:59 on December 11th.
Invitations expire after - If you want to set a specific number of days for the survey to be active, enter that number here. Days are defined as 24 hours after you save this setting. So, if you enter 1 day at 10:00am today, the invitation will expire at 10:00am tomorrow. Once the invitation expires, the link to the survey will no longer work. This is a handy setting for surveys where you need to leave the survey active but still limit the amount of time a user has to respond.
Active - Decide whether or not to activate your survey. A survey must be activated before you can send out invitations and collect responses. However, there are implications of making changes to an active survey. Be sure that the survey is complete and doesn't need any more changes before you activate it. You can deactivate the survey if you must make changes, or turn off protection.
Protection - Protection refers to "write-protect" for a survey. It means that when protection is on, you will be prevented from publishing changes to the survey while it is active. Publishing changes to an active survey can cause respondents who are in progress to lose their saved responses. The protection feature is designed to prevent this from happening. If you need to publish changes to an active survey, you can disable protection. However, be aware that this may also result in a loss of some data.
Authentication - When you check this you are requiring that an authentication key be associated with each email recipient, in order to ensure a unique response. See here for more information.
In addition, the Information section gives you the following useful information about your survey:
Status - the state of the survey. Can be any of the following:
Design - currently being designed; it has not been published.
Ready - a survey that has been published, but not activated.
Active - a survey that has been activated and is ready to collect responses.
Inactive - a survey that was at one time active, but has been deactivated.
Created On - The date when the survey was created.
Modified On - The date when the survey was last modified.

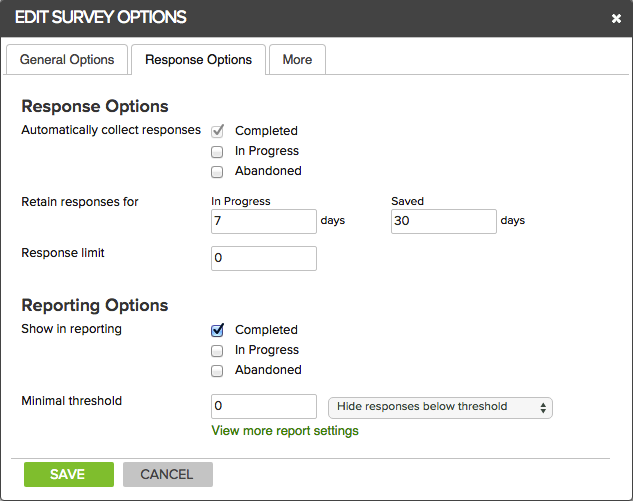
Automatically collect responses - Collect responses from the following types of surveys:
Completed - Checked by default. This means to automatically collect responses from surveys that have been completed.
In Progress - If this option is selected, then once a day (typically around midnight), an automated process will load data from all in-progress survey sessions into the database so that it is available for analysis. If this option is disabled, then in-progress data will only be collected if a manual in-progress data collection is initiated.
Abandoned - If this option is selected, then all data from abandoned responses will be collected in the database for analysis. Additionally, when this option is enabled, Survey Builder will track how many individuals started the survey, but abandoned without submitting a response.
Retain responses for - This refers to how long a survey remains open in the "In Progress" status before it changes to "Abandoned". During that time, respondents can come back and start where they left off to complete the survey - answers that have already been provided are "retained".
Response Limit - The response limit is the maximum number of responses you wish to collect for this survey. If the response limit is reached, the survey will automatically be deactivated and no more responses will be allowed. Leave the field blank to collect unlimited responses.
Show in Reporting - Show response data from the following types of surveys in reporting:
Completed - Checked by default. This means to automatically collect responses from surveys that have been completed.
In Progress - If this option is selected, then once a day (typically around midnight), an automated process will load data from all in-progress survey sessions into the database so that it is available for analysis. If this option is disabled, then in-progress data will only be collected if a manual in-progress data collection is initiated.
Abandoned - If this option is selected, then all data from abandoned responses will be collected in the database for analysis. Additionally, when this option is enabled, Survey Builder will track how many individuals started the survey, but abandoned without submitting a response.
Minimal Threshold - By setting a threshold for a minimum number of responses, you can hide the responses and simply see a message that the number of responses is below the threshold.
Hide Responses Below Threshold - This option displays a message that the response are below the minimum threshold only. There is no graph.
Highlight Responses Below Threshold - This option displays the graph that is dimmed and also displays a message that the responses are below the minimum threshold.
Note: A common use for setting a threshold is when you have so few survey responses that it's possible to identify which respondent submitted a specific response. For example, adding too many filter criteria joined by AND can result in a very small result set. This is not desirable when you have sent an unauthenticated survey that is otherwise anonymous.

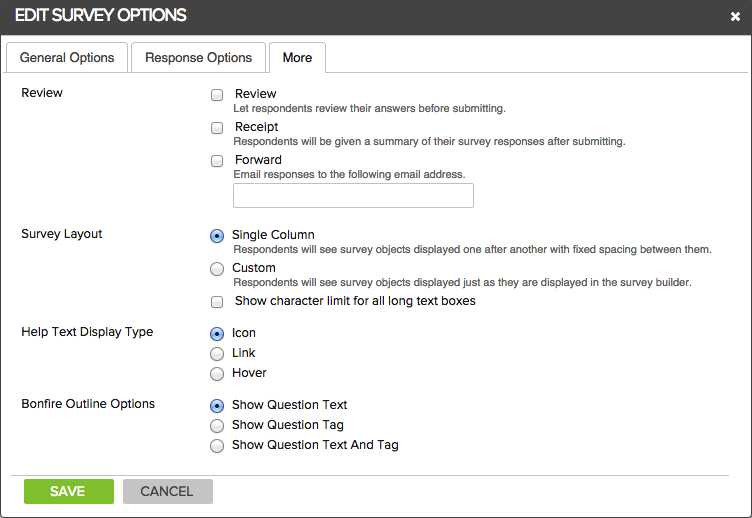
The More screen presents you with the following options:
Review - This section lets you add various functionality around having the respondent and others review the survey.
Review - adds a Review button to the final page of the survey. Clicking the button opens a popup window that lets the respondent review their answers and then go back and change them if necessary. The popup can be saved or printed.
Receipt - provides the same popup as Review, but only appears after the survey has been submitted so it's not possible to change the answers. The popup can be saved or printed.
Forward - lets you enter an email address for receiving responses as they are submitted. You should probably have a separate email box created for this purpose because every response will be emailed.
Survey Layout - There are two options for the way your survey is laid out, Single Column and Custom. You can also choose whether or not to show the character limit for long textbox questions.
Single Column - displays your questions one after another down the page. This setting is helpful when you have objects that may or may not display due to branching logic. Single Column mode closes up any blank spaces where an object is hidden.
Custom - displays your questions exactly the way you place them on the page, even if you overlap them.
Show character limit for all long text boxes - shows the respondent how many characters they have left as they are typing.
Help Text Display Type - You can add help text to any survey question to provide additional information that may be helpful for your respondents. The presence of help text can be indicated by
an icon, a link, or a hovering textbox.
Bonfire Outline Options - lets you control how questions appear in the outline view on the right-hand side of the Designer. Choose from text only, tag only, or both tag and text.
Note: If you choose to turn on Review or Receipt, you can use the Survey Options setting inside Survey Management to choose layout options that determine what is shown in the popups.
When you have finished editing your survey options, click Save.