
After you have defined your Case Program and saved it, the navigation bar at the top will change from this:
to this:

Click on the Case Form button. The following screen appears:
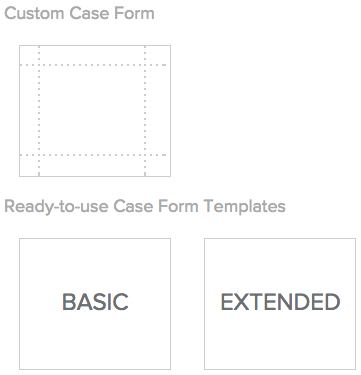
The MaritzCX platform offers you the choice between creating a custom case form and using a pre-defined template:
• Pre-defined templates contain a number of fields that provide you with a functional basic caseworker interface - you can then modify this as necessary.
• A custom case form is blank and requires that you create your interface from scratch.
For our example we will create a custom case form. Click on Custom Case Form. The Case Form screen appears:
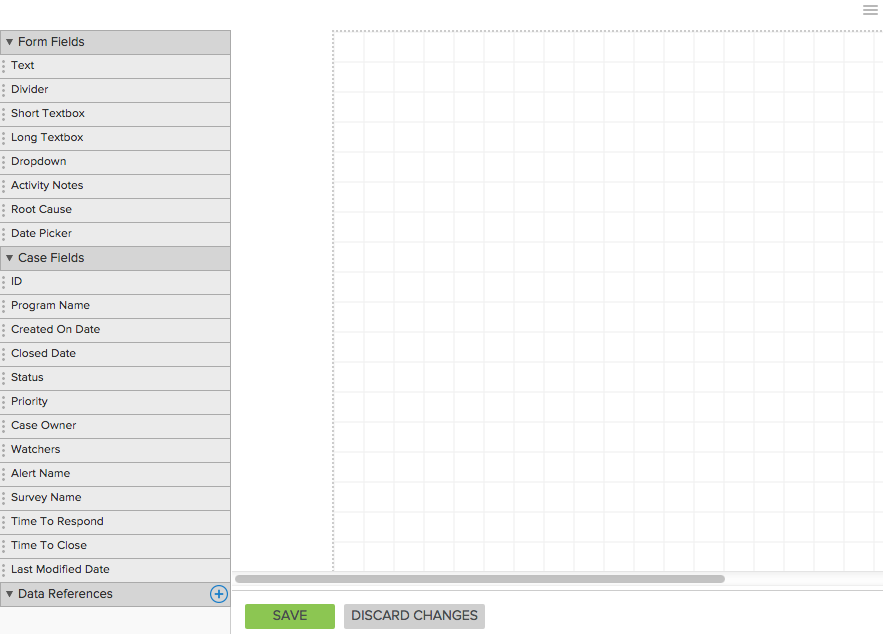
On the left side is a menu with the various elements you can add to your case form. To use one, simply drag it from the palette and drop it onto the canvas in the desired location. You can click and drag to size it, and double-click on it to edit its properties, such as making input required before a case can be closed.
Note: Consider carefully what data you want your caseworkers to capture because this data will be available in reporting; think of it as data appended to the customer's response.
Notice that the elements are divided into three categories:
Form Fields - These are customer-defined fields that are geared toward capturing input from the caseworker or case management administrator.
Case Fields - These are product-defined fields that are oriented towards metadata provided by the system about the case.
Data References - Data references are essentially variables: they are placeholders for data that is pulled from the survey(s) that generated the case. They can come from either the survey questions themselves or from a feed file attached to the survey. Common uses for them are to include customer contact information and responses in the case view.
To create your case form, simply add the desired elements to the canvas in the appropriate layout, then click Save when you are done.
Following are descriptions of the various elements:
These are customer-defined case fields that are geared toward capturing input from the caseworker or case management administrator. To use one, simply drag the desired element from the palette on the left and drop it onto the canvas in the desired location. When you double-click on an element that has been placed on the canvas, you can change the text in its field label.
Note: Some of the Form Fields contain a checkbox marked Required Field. If you check this, then the caseworker will not be able to save changes to the case until this field has been filled out.
Text - The Text field allows the case management administrator to add headings and other read-only text fields to the case management web page.
Divider - A Divider is just a simple dividing line used to delineate sections of your case management page.
Short Textbox - A Short Textbox is a text entry field that you can place on the case management page to let your caseworkers enter messages up to 256 characters in length.
Long Textbox - A Long Textbox is a text entry field that you can place on the case management page to let your caseworkers enter messages up to 1000 characters in length.
Dropdown - A Dropdown field lets you place a custom dropdown menu on your case management page. In addition to letting you modify the Field Label, a dropdown also allows you to define each item in the dropdown menu.
Activity Note - The Activity Note field lets you place an Activity Note form on your case management page. Activity note(s) are one or more sequential comments your caseworkers can leave describing the actions they take to address the case and bring it to resolution.
Note: Avoid positioning other controls beneath the activity notes control, since these often grow in length.
Root Cause - The Root Cause field enables you to place a root cause analysis tree on your case management page, with parent and child elements. Child elements can be nested under each other as deep as you need.
Root cause allows a case worker capture the category of the problem after having spoken with the customer. It is used for reporting so, for example, you could see how often customers cite a particular reason for their concern. The root cause control is flexible: it is a tree control that allows you to select one or multiple leaf nodes.
Date Picker - The Date Picker is a simple widget that allows your caseworkers to assign a date to the case on the case form.
These are product-defined case fields that are oriented towards metadata provided by the system about the case. To use one, simply drag the element from the palette on the left and drop it onto the canvas in the desired location. When you double-click on an element that has been placed on the canvas, you can change the text in its field label.
Some of these are strictly read-only, such as ID and Program Name, while others, such as Status and Priority, offer pre-populated default values but also allow the caseworker to use a dropdown menu to override the system-provided values.
Note: Some of the Case Fields contain a checkbox marked Required Field. If you check this, then the caseworker will not be able to save changes to the case until this field has been filled out.
ID - This is a unique (within the product) number assigned by the MaritzCX platform to identify the case. This field is read-only; it cannot be modified.
Program Name - This is the name you gave to the program in the Program Settings screen. In the Case View screen it is read-only; it cannot be modified.
Created On Date - This indicates the time that the case was created within the MaritzCX platform, as in this example: Jan 25, 2015 10:35 PM.
Closed Date - This indicates the time that the case was closed by the caseworker within the MaritzCX platform, as in this example: Jan 26, 2015 12:13 PM. While itself read-only, this field indicates the selection made by the caseworker in the field Case Status. If the case is still in progress, this field is blank.
Status - This is the status of the case, as entered by the caseworker in the Case Status dropdown menu. Possible values are : "New" (this is the default value when you first open the case); "In Progress"; and "Closed".
Priority - The is the case priority as assigned by the caseworker in the Case Priority dropdown menu. Possible values are "High", "Medium", and "Low". The caseworker can sort on priority in the inbox and it can be used for reporting purposes.
Case Owner - This is the owner of the case that was assigned in the Case Creation Rules tab of the Alert Setup screen. Possible values for it include all registered users of the MaritzCX platform or names from a feed file that you upload. In the Case View screen this value can be changed by the owner and any full access watchers.
Watchers - Adds the View/Add Watchers field, which lets you add limited or full access watchers to the Case View page. A watcher is someone included in the email distribution list for the case who has read-only or greater rights on the case, but who is not primarily responsible for the resolution of the case. For example, the caseworker's manager is often defined as a full access watcher of the case. Adding watchers can be a great way of getting collaborators involved with the case, as well as a useful notification to others.
Alert Name - This is the name of the case you defined in the Alert Settings tab of the Alert Setup screen. In the Case View screen it is read-only; it cannot be modified.
Survey Name - This is the name of the survey you associated with the program in the Program Settings screen. In the Case View screen it is read-only; it cannot be modified.
Time to Respond - This is the time that elapsed between when the case was created and when the caseworker saved his or her first changes to the case, displayed in the format ddhh. You may have defined a Time to Respond goal on the Program Settings page. If so, the text of the numbers will display in different colors based on the percentage of time that has elapsed out of this total: green when the case time remaining is more than two thirds away from the goal, yellow when it is less than one third away from the goal, and red if the goal has been surpassed.
Time to Close - This is the time that elapsed between when the case was created and when the caseworker changed the value in the field Case Status to "Closed”.
Last Modified Date - This adds a widget to your case form that will show the date when changes were last saved to the case form.
Data references are basically user-defined variables that draw their data from the survey(s) you have attached to your case management program. Once you’ve defined a data reference, it’s available for use elsewhere within your program, for instance in email templates.
The Data References menu allows you to place data references on your email template as desired:
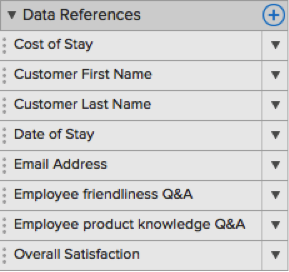
Note: Since data references rely on your survey questions and/or feed file for definition, yours will look different than this.
To place one in your email template, you must take two steps:
1. Create
the data reference. To do so, click on the plus icon  . The following window opens:
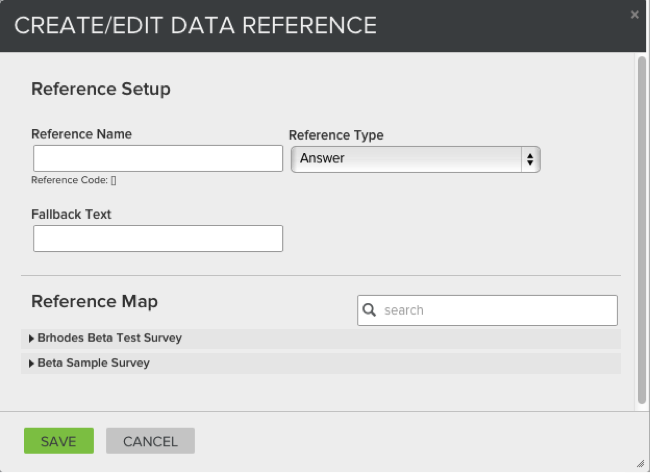
First, assign the Reference Name. The actual reference will appear in all caps in brackets, e.g. [EMAIL ADDRESS].
Second, choose the Reference Type. This can be one of the following:
• A question;
• An answer;
• An answer with value (number assigned to an answer to give it statistical meaning);
• A question with answer.
Third, choose any Fallback Text you want to appear in the event of an unanswered question, such as "No Answer Received".
Fourth, choose the survey question from which to pull the data. In the section marked Reference Map, the survey(s) attached to your program will appear. Simply click on its title to expand it, then select the desired question from it.
When you have finished, click the Save button.
2. Place the data reference in your template. The new data reference appears in the Data References list. Simply drag and drop it to the desired location in the template.
3. [Optional] Define email address or phone number. If the data reference is either an email address or phone number, you must specify this so that caseworkers can tap on these fields in the mobile app to launch the mail app for email fields or the dialer for phone number fields.
To do so, mouse over the right side of it to bring up its action menu, then select Edit. The Format Data Reference screen appears:
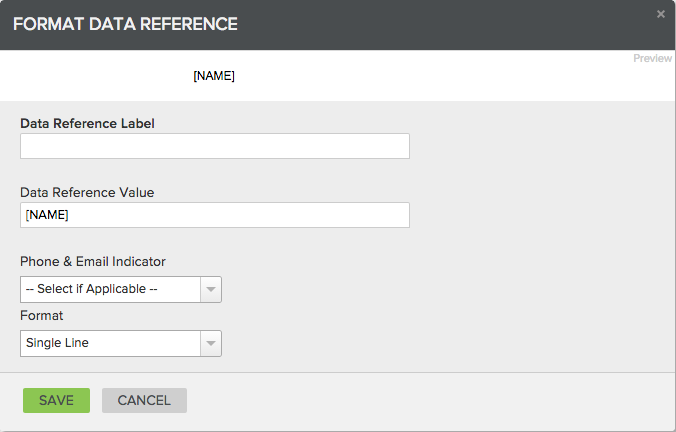
Use the Phone & Email Indicator to select whether it is an email address or phone number.
Use the Format dropdown menu to decide whether the data reference will appear as Single Line or Multiline. With Single Line, the content from the survey appears inline with the data reference label; with Multiline the content appears on multiple lines, beginning on the next line after the data reference label. This is to accommodate different types of survey responses. For example, Single Line would be appropriate for a satisfaction score value and Multiline would be appropriate for an open-ended question where the response length could greatly vary. Multiline data references will appear on the case view with a scroll bar if the content exceeds the size of the allocated text box.
When you have finished defining your Case Form, click the Save button.