
A feed file is a data file that you import into your survey in order to prepopulate the answers to select questions, such as the respondents' email addresses and other contact information, the assigned account rep, and anything else you may wish to include. It is an effective tool for this task because it allows you to discretely and efficiently add information to your survey responses that would not be desirable to either ask directly (e.g. having the respondent give their first and last names and email addresses when you already have this data) or display to them (e.g. their assigned account rep or other details of your organization).
The structure of your feed file is largely arbitrary: you will map its fields to the relevant survey questions as you go through the import process. The only field that is mandatory is the respondent's email address, though we also recommend that you include their first and last names. Different end uses, such as case management, will also require different field definitions. For example, an effective case management feed file would probably require you to define fields in your feed file that reflected your case management escalation path.
The following screenshot gives an example of the fields you might define for a feed file associated with case management:
Here are the steps necessary to attach a feed file to your survey:
Step 1
Take the following path through the interface:
Surveys | Engage7 Survey | <Desired Survey> Manage | Collect | Email Lists| New Email List
Step 2
The New Email List page appears:
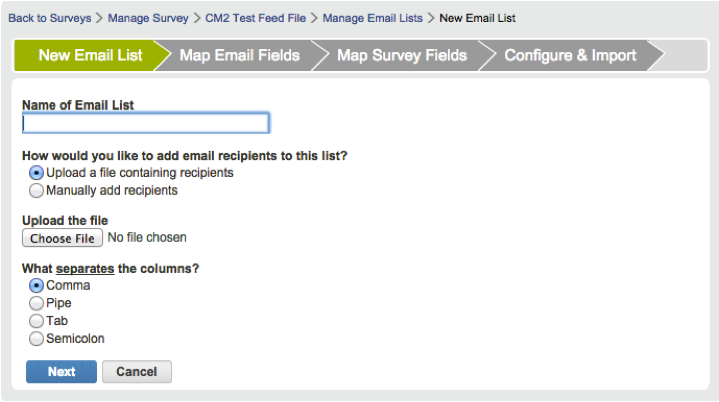
On it, you must perform the following actions:
• Name the list - this is mandatory.
• Decide whether to upload a file or add the recipients manually. To add a feed file, select Upload a file containing recipients.
• Select the file to upload.
• Select the delimiter used in the file - comma, pipe, tab, or semicolon.
Click Next.
Step 3
The Map Email Fields page appears:
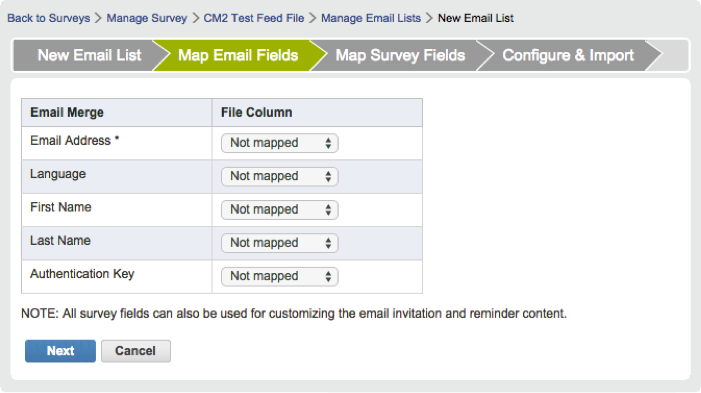
On it, you can link pre-defined fields in the MaritzCX platform (Email Merge) to columns in your data file (File Column). More specifically, the Email Merge column represents the system fields that can be included within the email invitation text. If the file column matches the name of the email merge field closely enough, it will automatically be mapped. Otherwise, you can map the field manually.
To do so, simply use the dropdown menus under File Column to map any unassigned fields in the Email Merge column.
Note: Be careful with Language. If there are languages referenced in the file that are not translated within the survey, those rows will not be uploaded into the email list. Clean up your file first to eliminate any languages that you have not translated in your survey.
Note: Authentication Key is usually not mapped. The exception is if you have a column in the file that contains unique values like account number or student ID number that you want to use as authentication keys rather than having the system randomly generate them. A common example of this is posting a link on a website and requiring the user to manually enter the authentication key so that you do not have to send email invitations.
When you have finished mapping the fields, click Next.
Step 4
The Map Survey Fields page appears:
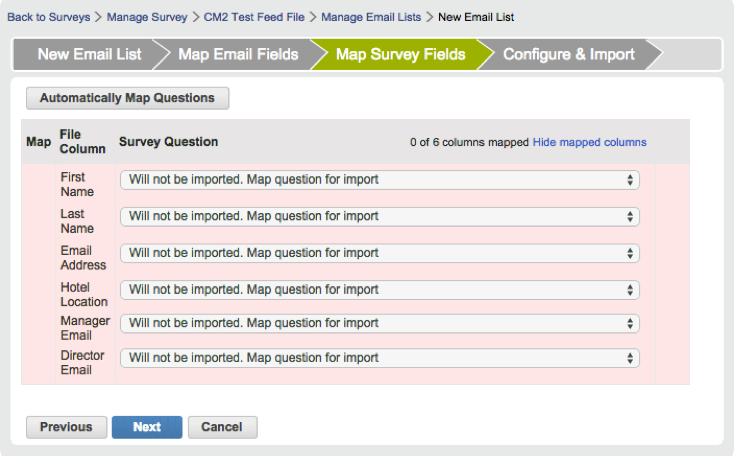
This tab lets you map columns from your data file to questions on your survey that you want to pre-populate. When you created your survey questions, you had the option to add tags to them. If you added tags that match the values under File Column, you can automatically map them on this page.
To do so, press the Automatically Map Questions button.
If you did not tag your survey questions or if some are left unmapped, use the drop-down menus in the Survey Question column to manually map the fields to the questions.
When you have finished mapping your survey questions, click Next.
Step 5
The Configure & Import page appears:
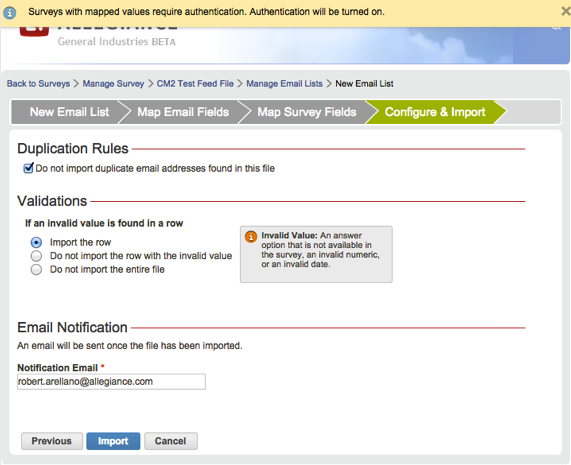
Notice the message at the top, indicating that authentication will be turned on. If you mapped anything on the Map Survey Fields screen, you will receive this message. Pre-population cannot happen without authentication.
In the section titled Duplication Rules, note that the checkbox marked Do not import duplicate email addresses found in this file is selected. The default setting for duplication is to not import duplicates. Email address is the only field considered to determine duplicates.
In the section titled Validations you select how you want to handle it if an invalid value is found in a row. Select from the three possibilities presented.
Finally, under Email Notification enter the email address of the person who should receive an alert when the feed file import is complete.
Click Import. The following dialog appears at the top of the browser window:

When processing is complete, your feed file is now attached to your survey. You will receive an email when the import is finished.